WebJaxe is easy to install, even with free hosting providers, and works on all operating systems thanks to the use of Java for the editor.
On the server
- A web server
- PHP 4 or PHP 5
- mysql
With PHP 4, it is also necessary to install the sablotron and iconv libraries.
 Remark
It is usually sufficient to install MAMP (on MacOS), XAMPP (on Linux) or WAMP (on Windows), which include Apache, Mysql and PHP. It is also possible to install the components separately, without forgetting the mysql module for PHP. Some packages have to be installed on Linux on top of PHP : php5-mysql for the link with the database, php5-xsl for XML documents transformations, and php5-gd for image processing.
For users
- A not-too-old web browser (for instance Firefox 2+, Safari 2+, Internet Explorer 6+)
- Java 1.6+ (preinstalled on many computers, it can be downloaded if necessary from java.com) OR a recent web browser (if Daxe is used instead of Jaxe)
Activation of PHP extensions
With PHP5, the PHP extensions php_xsl and php_gd2 must be enabled, but php_domxml must be disabled (it's an extension for PHP4).
With PHP4, the PHP extensions php_xslt, php_gd2 and php_domxml must be enabled. These extensions are enabled by default in some distributions (such as MAMP on the Mac), but not on others (such as WAMP on Windows).
Placing the folder
WebJaxe's folder can be placed anywhere on the website. The website root is often a folder called htdocs, in which the webjaxe folder can be copied.
File permissions
The PHP user needs write access to the following folders : site_config, contribXML, sites, historique, poubelle and tmp. Permissions for these folders should be checked before starting WebJaxe for the first time.
Creating the database
Initialisation
Open the following page in a web browser :
http://[your_website]/[WebJaxe_folder]/index.php
Remark
If your web server is running on any other port than the default one (80), it is of course necessary to add :port_number just after http://[your_website].
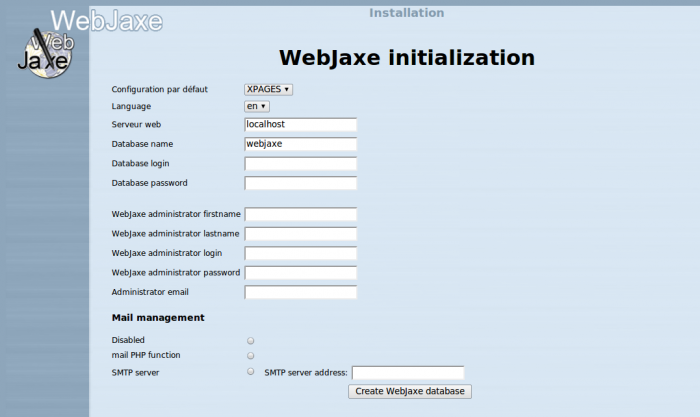
To start with an English configuration, choose XPAGES_en as the configuration, and en for the language.
To create WebJaxe's database, the login and the password for the database administrator have to be entered (often 'root' / '' or 'root' / 'root' by default).
The database is called webjaxe by default.
The other fields to fill in are used to create WebJaxe's administrator account, who will be the first user. Once this is done, click on the "Create database" button to finish WebJaxe's installation.
The mail management is used to alert for a new user, you have 3 options:
- Disabled : sending email is disabled
- mail PHP function : the email will be sent by using PHP function of your host
- SMTP server : the host or provider SMTP server adress have to be entered
Once this is done, click on the "Create database" button to finish WebJaxe's installation.
TeX equations images server
Those who would like to use equations with the TeX syntax in the XPAGES language also need to configure a little additional server. The Jaxe applet and its XPAGES plugin do not contain a TeX processor (it would be too heavy !). So, the plugin calls a server, sending the equation text, to which the server replies with the image of the equation. This server is already present in WebJaxe's serveurtex folder, but it requires the installation of the following programs : latex, dvipng and ImageMagick.
It is also necessary to edit the file config/XPAGES/XPAGES_config.xml by hand to specify the server to use (look for "tex.php" to find it). The default value is set to a server that is not necessarily available.
The paths to the commands convert and tex2png can be changed if necessary in tex.php.
Permissions should be checked to make sure the PHP user can write inside serveurtex/CACHE.
The information to access the database is stored in the site_config.xml file, located in the site_config folder. This folder is protected for the Apache web server with a .htaccess file if .htaccess files are enabled with the instruction AllowOverride in httpd.conf. This prevents reading site_config.xml directly from the web, while still letting WebJaxe use it.
This protection only works with the Apache web server. If you use another web server, such as IIS, you will need to protect the site_config folder in another way, for instance by editing its properties and forbidding reading. The way to do that is unfortunately different from one web server to another.
A .htaccess can also be added to the other folders in ordre to manage reading authorizations.
To avoid having to manage both Apache and WebJaxe users to control access, the lecture_fichier.php PHP script can be used with the Mod_rewrite Apache module. For instance, the following code can be placed in a .htaccess file in the contribXML and sites folders, to make sure that only authorized WebJaxe users can access the XML files and the websites created with WebJaxe :
<IfModule mod_rewrite.c>
RewriteEngine on
RewriteRule ^(.*)$ ../php/partie_utilisateur/lecture_fichier.php?fichier=%{REQUEST_URI}
</IfModule>
This code redirects read requests for all files in the folder to the lecture_fichier.php script, which only returns the contents of the files for connected authorized WebJaxe users.
Aside from that, for a better protection of passwords on the network, it is recommended to use https to connect to WebJaxe.
WebJaxe's directory contains sub-directories with files specific to WebJaxe, and others with files specific to the local installation. To update WebJaxe, simply copy the sub-directories specific to WebJaxe: config, daxe, design, editeur_config, jaxe, langues, php, serveurtex as well as the file index.php. If the database has to be updated, WebJaxe will be blocked until an administrator connects.