PAELLOS
Author: Damien Guillaume
- Introduction to PAELLOS
- Installation
- Requirements
- Download
- WebJaxe installation
- Server installation
- Configuration
- Forum and chat
- Creating contents with WebJaxe
- Introduction
- Administrator guide
- The administrator account
- Parameters and uninstall
- Validation of registrations and user management
- Project management
- Contribution management
- Adding a new configuration
- User guide
- Registration
- Login
- Contributions
- New contribution
- Operations on a contribution
- Edition of a contribution
- Associated files
- Changes history
- Preferences
- Search
- The XPAGES language
- Introduction
- Documents structure
- Informations
- Block elements
- Elements mixed with text
- Exercises
- Administration
- Starting
- Menu
- Registrations
- User accounts
- Website creation
- Maintenance
- E-learning platform
- Site registration
- Readings
- List of exercises replies
- Other features
- Using the editor to reply to exercises
- Jaxe equations syntax
PAELLOS
PAELLOS is a complete e-learning platform including a web interface to create new contents, and a work environment for students and tutors. PAELLOS makes it easier to create content with an explicit structure and meaning, which facilitates evolution and mainenance of large online courses.
License
PAELLOS is distributed under the GPL license.
For any information, please contact 
Introduction to PAELLOS
PAELLOS is a French acronym meaning Plateforme d'Apprentissage En Ligne Libre Orientée Sémantique (Free online sematic-oriented platform). PAELLOS includes :
- A system to edit courses and exercises (WebJaxe) allowing many authors to work together online on a project.
- A server providing a web interface for distance learning students and tutors based on these courses, and an administration interface.
PAELLOS is libre software (free as in speech) as well as free (as in beer) : the source code is provided with the software, and it is possible to change it and redistribute it so long as the source code is redistributed with the changes.
If the previous characteristics are not unusual, PAELLOS has the particularity to be semantic oriented. The editor used to create courses is indeed graphical, but not WYSIWYG : the focus is on the meaning of the different parts of the text by opposition to the way they will look on the web site. Authors edit XML documents (without having to know the XML syntax), and several websites can be automatically generated from these documents based on the documents semantic structuring. With the presentation well separated from the content, it is easy to change the appearance of the websites without touching the contents.
PAELLOS was designed and created specifically for online trainings in astronomy. It is thus adapted to fully online trainings, while other learning platforms are more oriented towards on-site learning with additional online course material. A highlight for all trainings in sciences is the integration of an equation editor in the content editor and in the reply editor used by students to write replies to exercises. The implementation took into account the needs expressed by students, tutors and administrators over many years, while still remaining lightweight. The interface is simple and functional.
Installation
Author: Damien Guillaume
Requirements
The following technologies are required :
- Java 1.5 or +
- Tomcat 6 or +
- a web server (like Apache)
- mysql 5 or +
- PHP 5 or +
The platform was tested on :
- MacOS X 10.6 Server
- Ubuntu 9.10 and 10.04 with Tomcat 6, Apache 2, mysql 5 and PHP 5
... but in theory in can work on other systems.
Some packages have to be installed on Linux on top of PHP : php5-mysql for the link with the database, php5-xsl (or php-xml for CentOS) for XML documents transformations, php5-gd for image processing, and php5-curl which is used for the forum authentication.
Download
The following file contains all PAELLOS (WebJaxe + server), with the source code :
paellos_1.0.tar.gz
WebJaxe installation
PHP extensions
With PHP5, the PHP extensions php_xsl and php_gd2 must be enabled
but php_domxml must be disabled (it's a PHP4 extension).
Folder location
WebJaxe folder can be placed anywhere in the website. The website root is usually a folder named htdocs, in which the webjaxe folder can be placed.
File permissions
The PHP user (which might be different from the web user) needs write access to the following folders in the webjaxe folder : site_config, contribXML, sites, historique, poubelle and tmp. Permissions should be checked before launching WebJaxe for the first time.
Initialization
Open the following page in a web browser :
http://[your website]/[WebJaxe's folder]/index.php
 Remark
If your web server runs on another port than the default one (80), make sure to replace http://[your website] by http://[your website]:[port number].
To create WebJaxe's database, the database administrator login and password must be entered (often 'root' / '' or 'root' / 'root' by default).
The database is named webjaxe by default.
Information on the account for WebJaxe's administrator must then be entered.
Mail management is used to alert the administrators when a new user registers. There are 3 options :
- Disabled : no email is sent
- PHP mail function : the email is sent using PHP's mail function, relying on the server mail system
- SMTP server : the provider SMTP server address must be entered
Once this is done, click on the "Create the database" button to finish WebJaxe's installation.
TeX equations images server
To use equations with the TeX syntax in the XPAGES language, a little additional server has to be configured. The Jaxe applet and its XPAGES plugin do not contain a TeX processor (it would be too heavy !). So, the plugin calls a server, sending the equation text, to which the server replies with the image of the equation. This server is already present in WebJaxe's serveurtex folder, but it requires the installation of the following programs : latex, dvipng and ImageMagick. It is also necessary to edit the file config/XPAGES/XPAGES_config.xml by hand to specify the server to use (look for "tex.php" to find it). The default value is set to a server that is not necessarily available.
The paths to the commands convert and tex2png can be changed if necessary in tex.php.
Permissions should be checked to make sure the PHP user can write inside serveurtex/CACHE.
Securing WebJaxe
The information to access the database is stored in the site_config.xml file, located in the site_config folder. This folder is protected for the Apache web server with a .htaccess file if .htaccess files are enabled with the instruction AllowOverride in httpd.conf. This prevents reading site_config.xml directly from the web, while still letting WebJaxe use it.
This protection only works with the Apache web server. If you use another web server, such as IIS, you will need to protect the site_config folder in another way, for instance by editing its properties and forbidding reading. The way to do that is unfortunately different from one web server to another.
A .htaccess can also be added to the other folders in ordre to manage reading authorizations.
To avoid having to manage both Apache and WebJaxe users to control access, the lecture_fichier.php PHP script can be used with the Mod_rewrite Apache module. For instance, the following code can be placed in a .htaccess file in the contribXML and sites folders, to make sure that only authorized WebJaxe users can access the XML files and the websites created with WebJaxe :
<IfModule mod_rewrite.c>
RewriteEngine on
RewriteRule ^(.*)$ ../php/partie_utilisateur/lecture_fichier.php?fichier=%{REQUEST_URI}
</IfModule>
This code redirects read requests for all files in the folder to the lecture_fichier.php script, which only returns the contents of the files for connected authorized WebJaxe users.
Server installation
- choose a short name for the webset, without any accented character or special character. It will be used as a path in URLs
- copy the serveur_paellos folder in Tomcat's webapps folder, and replace the folder name by the chosen name
Configuration
- edit the server ServletProperties file (it is in serveur/WEB-INF/classes/paellos)
- edit SITENAME/constantes.jsp in the UTF-8 character encoding. The site name must match the web application name, and therefore the folder name (it will be called SITENAME from now on).
- make sure the configuration files are not readable by all (but Tomcat must be able to read them)
- If necessary, to let Tomcat manage the "SITENAME" application, add in Tomcat's conf/server.xml the informations in exemple_pour_tomcat_6_de_server.xml (there is for instance a connector to redirect queries from Apache). Initially, it is better to try without changing this file (it's edition is no longer necessary since Tomcat 6).
- replace the logo.png file by your training's logo
- make sure Tomcat's connector uses URIEncoding="UTF-8" in conf/server.xml (otherwise search queries will not work with accented characters).
If a security manager is enabled (this is for instance the case by default with Ubuntu 9), the web application has to be authorized to do local connections to mySQL, as well as reading the website files, use the indexation files for search queries on the website, and use certain classes :
create a file named tomcat6/conf/policy.d/paellos.policy, with (by changing "SITENAME", "serveur.smtp", "/var/www" and ".../index_lucene" if necessary) :
grant codeBase "file:${catalina.base}/webapps/SITENAME/-" {
  permission java.net.SocketPermission "localhost:3306", "connect,resolve"; // access to the SQL database
  permission java.net.SocketPermission "smtp.exemple.fr:25", "connect,resolve"; // sending emails
  permission java.io.FilePermission "/var/www/webjaxe/-", "read"; // reading WebJaxe files
  permission java.io.FilePermission "/var/www/public", "read"; // generating the public website
  permission java.io.FilePermission "/var/www/public/-", "read,write,delete"; // generating the public website
  permission java.io.FilePermission "${catalina.base}/webapps/SITENAME/WEB-INF/sites", "read"; // training websites
  permission java.io.FilePermission "${catalina.base}/webapps/SITENAME/WEB-INF/sites/-", "read,write,delete"; // training websites
  permission java.io.FilePermission "${catalina.base}/webapps/SITENAME/WEB-INF/index_lucene/-", "read,write,delete"; // indexation files
  permission java.lang.RuntimePermission "accessClassInPackage.org.apache.jasper.compiler"; // jsp compilation
  permission java.lang.RuntimePermission "accessClassInPackage.org.apache.jasper.compiler.*"; // jsp compilation
};
- If Apache is used as the main web server, it is possible to use it for all queries with specific paths, and to redirect the queries to Tomcat. This can be done with Apache's mod_jk module. It might be necessary to install mod_jk if it is not already installed (on Ubuntu, it can also be necessary to install the mods include, rewrite and suexec for Apache, and to change the owner of the webapps folder). For instance, here is how mod_jk can be configured in httpd.conf :
# warning: with Apache 2, do not use AddModule, and replaced httpd by apache2 in the paths
AddModule mod_jk.c
<IfModule mod_jk.c>
  JKLogFile /var/log/httpd/mod_jk.log
  JKWorkersFile /etc/httpd/workers.properties
  JKMount /SITENAME/* PAELLOS
</IfModule>
and workers.properties should be added next to it (if it already exists, it should be combined).
In each Virtualhost (typically the files in sites-enabled), the following code must be added :
<IfModule mod_jk.c>
  JkMountCopy On
</IfModule>
On Tomcat side, a matching connector is required to listen to incoming queries, as described in the exemple_pour_tomcat_6_de_server.xml file included in PAELLOS
- possibly change the site home page, index.html (located in SITENAME/site/) (for instance to disable the links to the forum and the chat room if they are not used).
Forum and chat
The forum and chat features are optionnal. The discussion forum suggested with PAELLOS is phpBB (a plugin provides automatic authentication on a phpBB forum with PAELLOS' database).
Forum installation
- install phpBB3 from http://www.phpbb.com/, and add auth_paellos.php (requires php5-curl on Linux) in includes/auth
(this is needed to use PAELLOS database for authentication on the forum ;
the forum administrator must already exist in the database)
- In the administration, "General" tab, "Authentication" link, choose the "Paellos" method and enter the information required to connect to PAELLOS database : server (use "localhost" if it's on the same machine), user name, password and database name.
- (to see the users firstnames and lastnames) in the administration, go to the "Users and Groups" tab. Click on the "Custom profile fields" link. Add the fields "firstname" and "lastname" (single text field) (with a title of your choice). The values will be automatically added when users connect to the forum for the first time.
- Create a group "XXXX Students" and a group "XXXX Tutors" with the training name. The group names are in the file auth_paellos.php, they can be changed if necessary.
- Create forums with matching rights for the groups. For instance, users rights should be given to the matching forum for the student group, and moderator rights for the tutor and administrator groups.
Chatroom installation
The mChat module for phpBB was tested, but other solutions are possible.
- install mChat for phpBB :
http://www.phpbb.com/customise/db/mod/mchat_new_version/
(AutoMOD can help for the installation; the theme should be refreshed after the installation, otherwise the chat is displayed on a blue background and the scrollbar is missing; group permissions should also be added to let users use the chat)
Creating contents with WebJaxe
Introduction
The WebJaxe CMS is included in PAELLOS, and is used for collaborative creation of XML documents in the XPAGES language. An automatic transform can transform these documents into websites. It can be done directly in WebJaxe to get a preview for authors, or with the PAELLOS platform administration to generate the training website for students and tutors.
Administrator guide
Authors: Damien Guillaume, Soufiane Ayadi
The administrator account
The administrator account is created at initialization time. It is possible to change the fields for this account in the user management section.
It will be assumed for now on that you are connected to the site as the administrator, which enables the administrative functions.
Parameters and uninstall
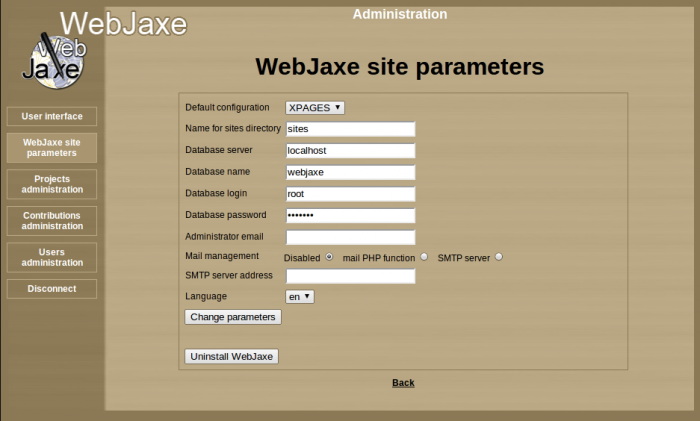
Site parameters
The parameters page lets you edit the following parameters :
- Jaxe configuration : choice of the XML language used for all contributions (currently provided with WebJaxe : XPAGES French, XPAGES English, or XHTML strict)
- Name of the websites folder : folder in which websites will be generated
- Database server : the address of the server hosting the database
- Name of the database : by default : webjaxe
- Database login : login to connect to the database
- Database password : password to connect to the database
- Administrator email : address where you receive the alerts email
- Mail management : Manage sending email
- SMTP server address : your provider or host SMTP server
Hint
It is possible to use "../.." instead of "sites" for the name of the websites folder, so that websites are generated directly at the web server root (assuming the webjaxe folder is located at the root). If you use this trick, be careful with possible folder names conflicts.
Uninstall
To remove the database and the contributions, just click on "Uninstall WebJaxe".
Warning, the result is immediate !
Once this is done, you just need to remove WebJaxe's folder on the server to get rid of it completely.
Validation of registrations and user management
User management
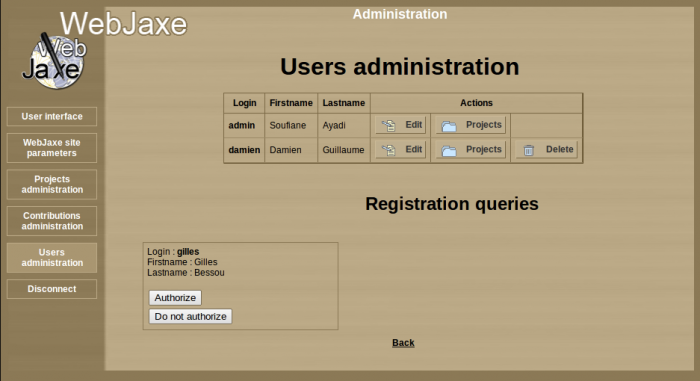
Each registration request is recorded in the database, but the corresponding users cannot connect until their registration is validated by the administrator. If the administrator rejects a registration, it is deleted.
The list of registration queries on the "User management" page gives the list of the users who registered, and lets you accept or not each registration.
From the user management page, it is also possible to :
- Edit the fields for users in the database, in particular passwords (leave the field empty if you don't want to change a password).
- Remove a user definitely. His contributions then pass under control of the administrator.
Project management
Project management
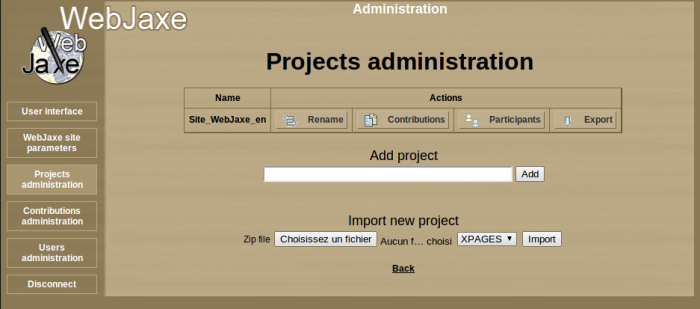
The project management page is used to create new projects, and change the list of contributions and participants for each project. There is no direct link between contributions and users: the links are established through the projects.
The administrator can organize projects as a tree, which is handful when there are a lot of contributions. To change the tree structure, click on the "Sub-projects" button for the parent project on the project management page. The list of sub-projects can then be changed for this project. A user associated with a project is implicitely associated with all the descendant projects. An export of the parent project will contain all the contributions of the parent project and its descendants.
Contribution management

Contribution management
Each contribution is associated with a single project.
The contribution management page gives the list of the contributions, and can be used for each contribution to change the associated project, to edit it or remove it.
A form at the bottom can be used to create a new contribution.
This page can also be used to edit a contribution (by redirecting to the "user side" of WebJaxe), and to remove a contribution.
Adding a new configuration
WebJaxe is distributed with a configuration for the "XPAGES" XML language (in French and in English), and another one for the "XHTML strict 1.0" XML language.
It is possible to add new configurations to edit documents in other XML languages, and generate corresponding websites.
To add a new configuration, that we will call "MYCONFIG" :
- Create a folder named MYCONFIG in WebJaxe's config folder.
- Place inside the Jaxe configuration file using the file name MYCONFIG_config.xml, as well as the XML schema.
- To enable transformations into websites, it is necessary to create a file called MYCONFIG.php in a php folder inside the MYCONFIG folder, with the PHP function transfo_webjaxe($contribs_folder, $xml_to_process, $path_to_site, $config_folder, $temp_folder). The XHTML config gives a simple implementation example for this function, using an XSLT transform.
User guide
Authors: Damien Guillaume, Soufiane Ayadi
Registration
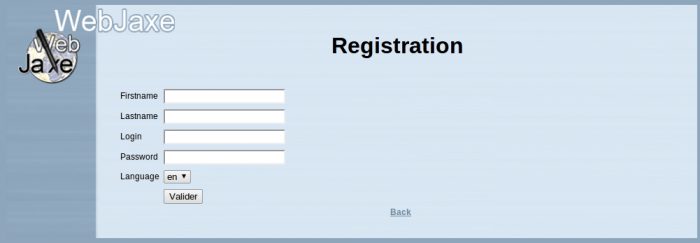
Registration on a WebJaxe website
To participate to the creation of a website with WebJaxe, it is first necessary to register. To do that, just go to the registration page (there is a link from the first page), and fill in the different fields.
The login is a unique identifier. A new user is choosing the login, but (as opposed to the fields for the firstname and the lastname), the only letters accepted are the letters from a to z, with no space or special character.
Choose an original password, but don't lose it ! You can ask for help to the administrator if you lose it, but changing a password is not automatic.
Once the registration form submitted, the administrator will be able to validate (or not) your registration. It is only after the registration is validated by the administrator that it becomes possible to log in, with the chosen login and password.
Login
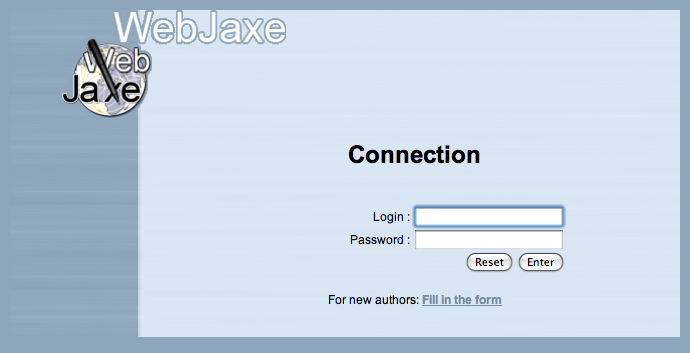
Login for a WebJaxe website
To log in, just enter the login and password chosen at registration time.
Contributions
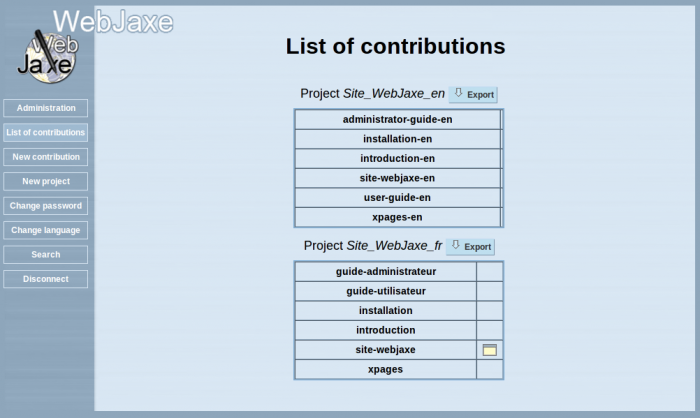
List of contributions
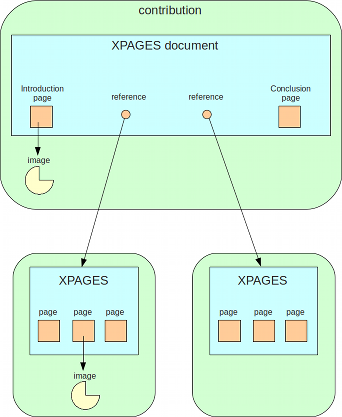
Creating a website is done with a number of contributions. A contribution corresponds to a set of pages on a given subject (usually less than 10 pages). A contribution is a folder containing an XML file with the text of the pages, and the files of the images used in the pages.
Certain contributions are only used to link contributions with each other. For instance, it is possible to create a contribution for the whole website to create, and this contribution will only contain links to the other contributions.
Contributions are organized into projects. A project gathers contributions and authors on a given subject. All the authors in a project can edit all the project's contributions.
As a user, you can create a new project, a new contribution, and edit the contributions created by other users if these contributions are in a project of which you are author. The administrator can add authors or contributions to a project.
A project can be exported. This operation starts the download of a ZIP file containing a copy of all the contributions in the project.
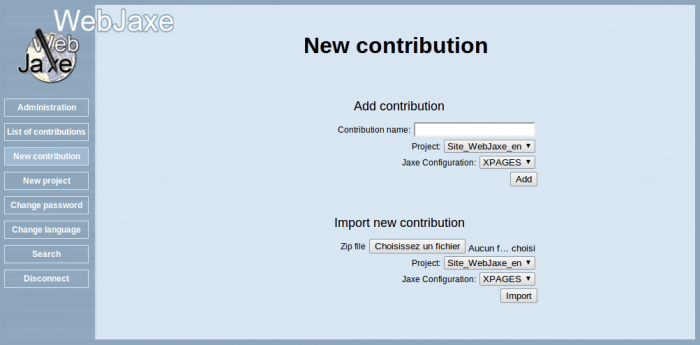
New contribution
Nouvelle contribution
There are two methods to create a new contribution in WebJaxe: the creation of an empty contribution, and the import of an existing contribution. In both cases, it is necessary to specify the associated project and the Jaxe configuration (which corresponds to the XML language).
In the case of an import, the imported file must be a ZIP file with the name of the contribution. This ZIP file must contain a folder with the name of the contribution, containing an XML file with the name of the contribution. For instance, the imported file could be "my-contribution.zip", containing a "my-contribution" folder, with a "my-contribution.xml" file inside.
Since contribution export uses the same organization, it is easy to export a contribution from a WebJaxe site and to import it into another one.
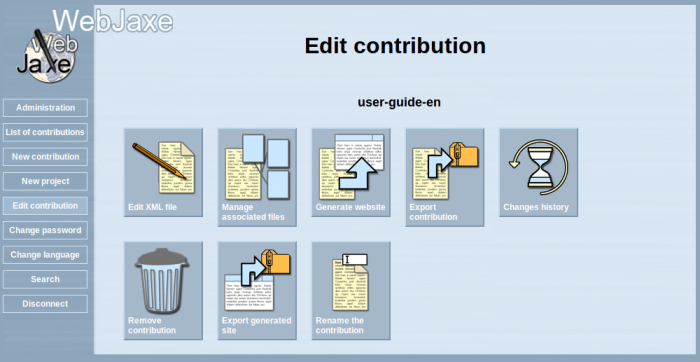
Operations on a contribution

Possible operations on a contribution
There are 10 possible operations on a contribution :
- Edit XML file : this operation launches the applet with the Jaxe editor. It is necessary to enable Java (version 1.6 or later) in order for this operation to work (Java is not to be confused with Javascript - Javascript is not necessary with WebJaxe).
- Manage associated files : this lets you deposit images on the server, and organize them into folders. The image files can then be referenced in the editor to be incorporated into pages.
- Generate website : this starts the automatic generation of the website, and redirects to the home page of the new website. It can be necessary to use the web browser "reload" button if old pages (preserved in the browser cache) are displayed.
- View website : available once the website has been generated, this operation can be used to go directly to the website without generating it.
- Export contribution : compresses all the contents of the contribution in a ZIP file, and downloads it. The ZIP file can then be uncompressed, and the XML file can be edited with the Jaxe application off-line.
- Changes history : when the XML document has been changed, this operation is used to check the differences between each version of the document and the latest version.
- Remove contribution (only available if the user is the only author for the contribution's project or if he is the administrator) : removes the contribution.
- Renaming of the contribution
- Export website: regenerates all the website, and compresses its content in a ZIP file.
- Clearing the generated website
Edition of a contribution
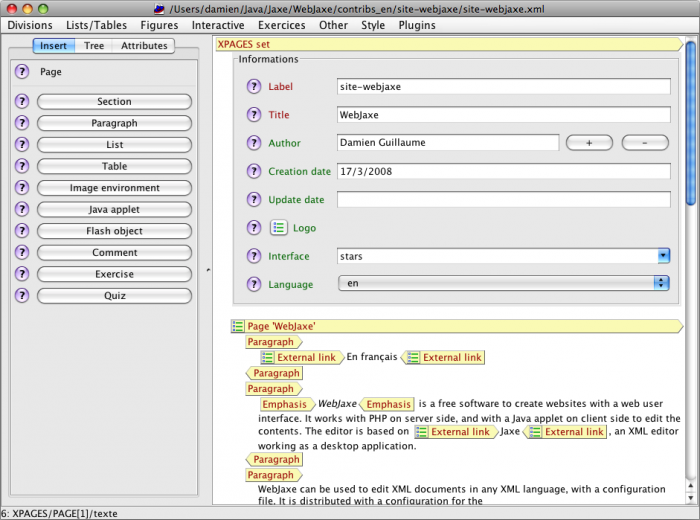
Edition with Jaxe
WebJaxe's editor requires Java 1.6. It opens in a new window. Be careful not to close the initial window in the web browser, because that would make the edition window disappear without letting you save the document.
Remark
There is a bug in Firefox and some other web browsers which prevents reading XML files if the option "Allow third-party cookies" is disabled. With these web browsers, this option must be enabled in the preferences. Another solution is to add an "exception" in the cookie settings so that cookies from WebJaxe's server are always authorized.
The editor works with the XML meta-language, and entered texts are thus organized with begin and end tags. Each piece of text is surrounded by tags that give it meaning. New elements can be inserted with the menus, or with the insertion panel on the left of the window. The insertion panel only displays elements that are allowed at the cursor position, in order to prevent the creation of an invalid document (a document that does not respect the rules of the chosen XML language).
The available elements, as well as the tree rules for the elements, are defined by the XML language chosen by the administrator. It is important to learn the chosen language to use the editor in the best way. A specific documentation exists for the XPAGES language, whose WebJaxe configuration is provided with WebJaxe.
There exists a user guide for the Jaxe application, that mostly applies to WebJaxe's editor. However, there are some features that don't exist in WebJaxe. Some other features are disabled because of security restrictions imposed to Java applets by web browsers, such as copy/paste (see below).
Copy / Paste
By default, Java applets are not authorized to read the system clipboard. In general, this means it is not possible to do a copy-paste from another application. There are two methods to work around this problem:
Associated files
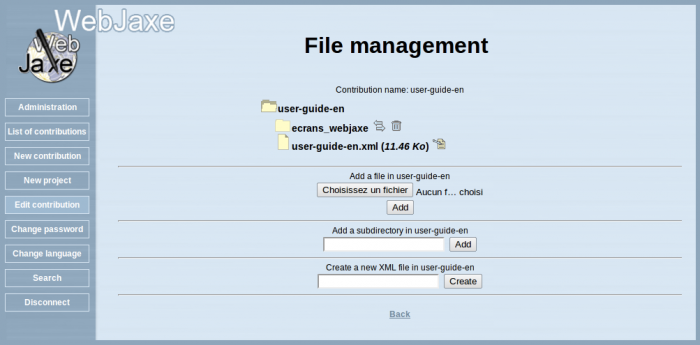
Management of associated files
This page is used to manage the files associated to a contribution. They are usually files of images used when editing the XML document. It is possible to organize these files with directories. To add a new file, just click on the corresponding button, choose the file on the local hard disk, and click on the "Add" button. It is then displayed in the list of files for the current directory.
Once an image file is added, it is possible to use it during edition. For instance, with the XPAGES language, an image is added by first creating an "Image environment", and then adding a "File" inside. The path to the image file in the contribution is used as the "file name", for instance "logo.png". The image is displayed in the editor when the dialog is validated.
Changes history
Operations on a contribution: Changes history
The Changes history button displays when the XML document is changed.
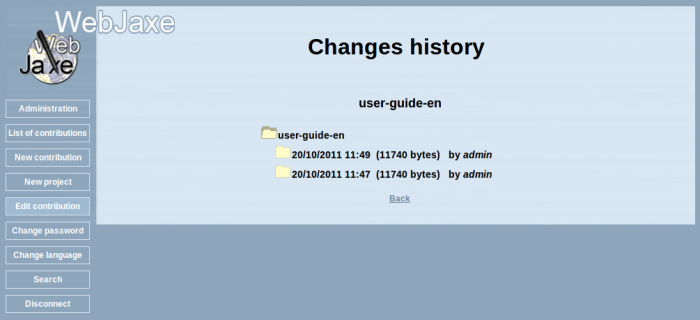
Changes history
Each history is followed by the login of the author who has changed.
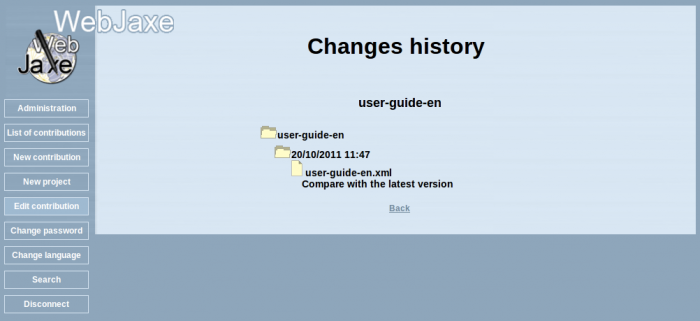
Comparison with the latest version
You can compare versions of the XML document, and check the differences between each version of the document and the latest version.
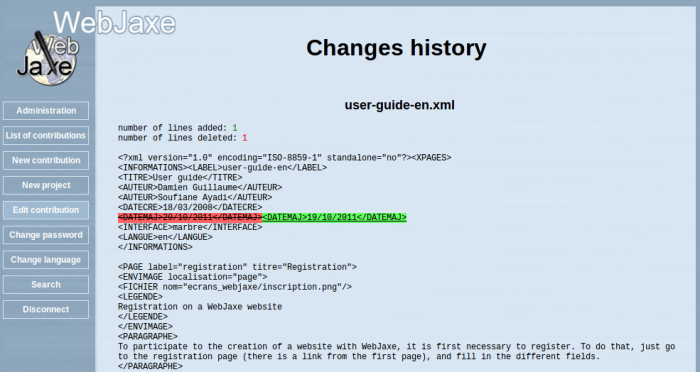
Differences between each version of the document and the latest version
Preferences
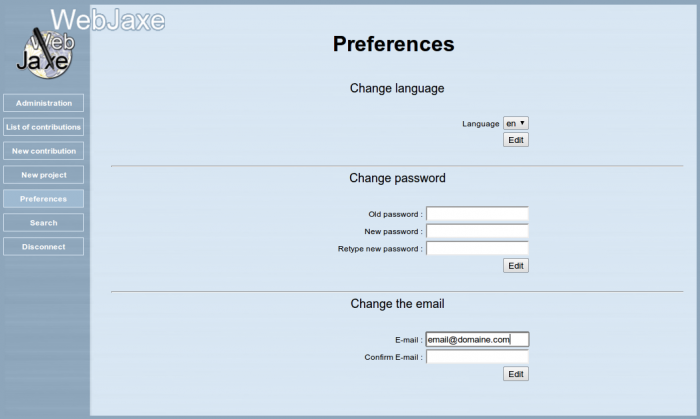
User preferences: Change the language, the user password or email
Change the user interface language. The default language is one that was chosen during the registration on WebJaxe.
The new password must use at least 4 characters, and must contain only letters without accent, numbers, dashes or underscores.
The email adress must be valid.
Starting with WebJaxe 2.0, it is possible to choose the editor. Jaxe, the default editor, works as a Java applet and requires an enabled Java plugin in the web browser. Daxe works with Javascript and requires its activation. Daxe only works on modern web browsers (for instance, it does not work with Internet Explorer before version 9).
Search
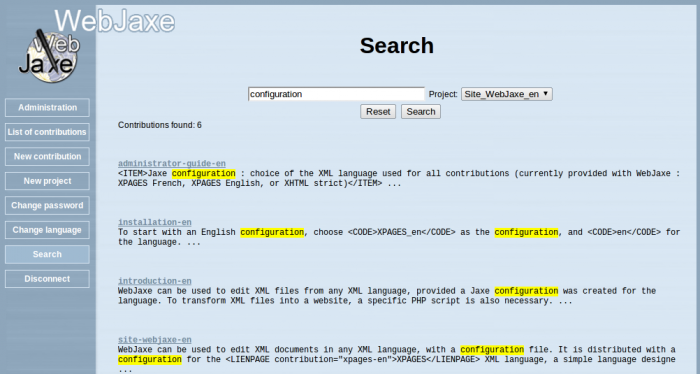
Do search
This page allows the user to search for a keyword in all the contributions of a project.
The XPAGES language
Author: Damien Guillaume
Introduction
 Introduction
XPAGES provides a way to create websites quickly and easily. XPAGES is based on the principle of separation between content and presentation : with XPAGES, the content (text, images, animations) is entered, and is structured with a meaning associated to each part. An author does not worry about the way content will be displayed later on, which saves time and avoids mixing meaning with presentation. The way content will be displayed is specified separately, with stylesheets. Thus, it is possible to change the display independently from the edition.
XPAGES is an XML language, i.e. a set of elements and rules designed to structure a text. Associated stylesheets can automatically transform XPAGES documents into HTML files so that they can be viewed on the web. XPAGES documents can be edited with Jaxe and WebJaxe thanks to a configuration file describing the edition user interface.
XPAGES is a very simple language, easy to learn : it features only 59 elements (46 without the exercises), to compare for instance to the 91 elements in HTML, 390 elements in DocBook, or 526 elements in OpenDocument.
Documents structure
Organisation
XPAGES documents have a root element, XPAGES set, that is used in all the documents as a first level element. Under this element, the following elements can be found : Informations, Page, Ref. XPAGES document and XPAGES set.
- Informations is a metadata block, i.e. informations about the document. It is described later on.
- Page represents a web page, and has a title and a label used to create links to the page. In the latest version of XPAGES, it is possible to associate a semantic role to pages (as with sections).
- Ref. XPAGES document is a reference (via the label) to another XPAGES document, that will be included in place of the Ref. XPAGES document element. This is used to create a website with several levels : for instance, one can create a website with a home page, and several sets of pages. To do that, an XPAGES document is created for the website, containing the home page and Ref. XPAGES document references to the different sets of pages in the website.
- XPAGES set under XPAGES set can be used to add another level to the tree, as with REFXPAGES, but without creating a new document.
Inside a page, sections can be created with the Section element. This element has a title, a role that specifies the meaning of the section and can result in a different display for each function, and an importance that can be used to highlight the section if it is important.
The text is added inside paragraphs, with the Paragraph element. It is easy to insert a new paragraph with the command-P or control-P shortcut in Jaxe.
It is possible to create several contributions, each one containing an XPAGES XML file and the associated files (images, Java applets, ...). Each contribution corresponds to a folder whose name is the same as the label given in the Informations block in the XML file. This folder contains the XML file and the associated files.
Informations
The information block provides information about the document, and is also used to choose a skin for the generated website. It is required, and is located at the beginning of the document. It has the following children :
- Label : a name used later to reference the document with the Ref. XPAGES document element, to include the content of the document in a larger one. The label is required, and must match the name of the XML file without the ".xml" extension. In WebJaxe, this label must simply be the name of the contribution.
- Title : the document title (required).
- Author : an author of the document. It is of course possible to specify several authors.
- Author : the creation date of the document, with the syntax DD/MM/YYYY.
- Update date : the update date of the document, with the syntax DD/MM/YYYY.
- Logo : path to an image file with a logo to use on the website. The image must be in a standard format for the web (JPEG, PNG or GIF). It is possible to specify a link to use when the logo is clicked.
- Interface : choice of a skin for the pages.
- Menubar : to choose whether or not to display the buttons on top of web pages to navigate to the subsets referenced with REFXPAGES.
- Language : the code for the document language (en for English).
Block elements
Block elements are XML elements that can be directly inserted inside a Page element. They are used to structure the document, but are not mixed with text : it is not possible to insert text directly under Page, because text must necessarily be inside a block element.
XPAGES has the following block elements :
- Section : used to identify an area inside a page, with a title, a semantic role, and an importance. The role is optional, but is important to give meaning to the different parts of the document. It can also be used later to display sections with the same role in a similar way, to visually distinguish them from other sections.
- Paragraph : a paragraph is one or several sentences. To do a "line break" (this idea is quoted because it is related to presentation instead of content), it is necessary to create a new paragraph.
- List : a list of List item elements with bullets or numbers. Items can contain text, but also paragraphs or sublists.
- Table : a table is formed with a given number of lines and columns. It is possible to specify a line of titles (the first line of the table). Also, cells can be merged, and an alignment can be specified inside the cells.
- Image environment : an element grouping the informations related to an image, animation or video (copyright and legend), and a link to the corresponding file. It is also possible to create a link on the image, so that a click on it redirects to another part of the site or an external page. In the case of a video available in several alternative formats, the files have to be specified inside a Formats element.
- Interactive application : a program written in Java, Flash, or HTML/Javascript. This new XPAGES element replaces the old elements Java applets and Flash object. If an application is used several times on the site, it is possible to store it in a contribution and to use it in other contributions. In that case, the contribution attribute is used to specify where to look for it.
- Comment : a comment of the author, that will not be displayed on the website. Very useful for instance to mark parts to develop or correct at the time of writing.
- Code : a block of computer code whose formatting must be preserved.
- Exercise : an exercise (see later).
- Quiz : a quiz (see later).
- Bibliography : a list of bibliographic and webographic references.
Elements mixed with text
Some XPAGES elements can be mixed with text, for instance inside a paragraph. They are the following elements :
- Link to internal page : link to a page on the same website. To identify the page to link to, the label of the contribution and the label of the page have to be entered. If only the label of the page is given, it is assumed to be in the same contribution. If only the label of the contribution is given, the link directs to the first page in this contribution.
- External link : link to a web page external to the website. The address (URL) must start with "http://".
- Image link : link to an image environment. Can only be used for images on the same page. For instance, it is possible to change the displayed image with the "page" layout by using several image links in the text of the page.
- File : an image or animation file. Normally used inside an Image environment element, so that a legend can be specified, but it can also be used within the text (for instance to include a symbol that could not be created with an equation).
- Symbol : greek letter or mathematical symbol.
- Equation : equation based on Jaxe's equation editor syntax.
- TeX Equation : equation based on the TeX syntax.
- Glossary word : word to include in the glossary. The word to display is specified with the word attribute, and the definition for the word is given within the Glossary word tags.
- Emphasis : emphasis (to highlight one or several words).
- Superscript : superscript text
- Subscript : subscript text
- Code : computer science code (usually displayed with a monospaced font)
- Non-breaking space : non-breaking space
Exercises
XPAGES can be used for many applications, but it is especially handy to create online courses, and was created in this context. For these reasons, the language contains elements specific to the definition of exercises, even though these elements might not be useful outside of the context of online courses.
There are two types of exercises : the question-answer type (Exercise element), and the quiz type (Quiz element). In both cases, an exercise can have a title (title attribute), an indication of the difficulty (Difficulty element), an indication of the time necessary to complete the exercise (Time element), and questions (Question and Quiz question elements).
Each question can have terms (Terms element) and one or more helps (Help element). Questions of type question-answer have a solution (Solution element) and a number of points that can be granted if the answer is correct (Points element). Questions of the quiz type have possible answers (Quiz answer element), each answer being either right or wrong (correct attribute), with the text of the answer (Answer text element) and a comment which will be displayed to the user should he choose this answer, for instance to explain why the answer is wrong (Answer comment element).
In Jaxe, solutions for evaluation exercises are not added to HTML when the "public website" is generated. They are added when the "production website" is created. WebJaxe always creates the production website. To create a public website from a contribution in WebJaxe, the contribution has to be exported and opened with Jaxe. In this way, it is possible to create, from the same XML files, a website for students, and another one for tutors for an elearning program.
Administration
Author: Damien Guillaume
Starting
Administrator registration
The administrator must start by registering as a tutor with the page SITENAME/Inscription?fonction=tuteur (the first user to register is automatically validated as an administrator).
Menu
After connecting to the administration interface (at SITENAME/Administration), the following menu appears :
- New registrations
- Valid users, open accounts
- All valid users
- Creation of the website
- Website
New registrations is used to validate registrations to the training website. Valid users, open accounts and All valid users are used to manage user accounts. Creation of the website is used to generate the training website (for students and tutors) and the public website. Website redirects to the training website, for instance to check student readings.
Registrations
The following fields are displayed for each registration query :
- User name
- Lastname
- Firstname
- Email
- Role
The remove action is available to quicly remove queries.
To validate a registration query, it is necessary to :
- click on the link on the user name
- if it's a student, assign a tutor (the tutor list is available in a menu)
- check the "Valid" checkbox
- click on the button "Save the fields"
A registration validation is of course also a good time to check the fields, especially the email address.
When a registration is validated, an email is sent to the user to warn him. If it is a student with a tutor, another email is sent to the tutor with the student identification. It is possible to assign a tutor after validation, but in this case no email is sent to the tutor.
User accounts
Fields :
- User name: only lowercase letters without accent and digits are allowed in the user name.
- Lastname
- Firstname
- Password
- Email
- Role; possible values : student, tutor, supertutor (same as tutor but with access to information on all students), author (same rights as a tutor but does not appear in the list of tutors), administrator (access to the administration interface), system (all privileges)
- Birthdate: birthdate with the format YYYY-MM-DD
- Training: code for the training
- Level (unused by default) (scientific, not scientific)
- Modules (unused by default): modules followed by a student
- Subject (unused by default): subject taught, for the teachers training
- Class (unused by default): class taught, for the teachers trainin
- Registration date: date the registration was sent, with the format YYYY-MM-DD
- Closing date: date the account was closed, with the format YYYY-MM-DD if it is closed. Empty if the account is open. A method to close an account consists in writing today's date in this field.
- Tutor: the interface lists all tutors to make it easier to select one.
- Center: training center (unused by default)
- Valid: checked if the registration has been validated. A way to sent validation emails again consists in unchecking the valid checkbox, save the fields, recheck the checkbox and re-save.
User address :
- Street
- Zip code
- Town
- Country
- Phone number
- Connection
- Access
Actions availables with the user lists :
- Close : sets the account closing date to today's date
- Remove : after a confirm, deletes the account with all associated information (connections, page readings, replies to exercises)
Website creation
If the server configuration includes the path to the websites, it is possible to automatically generate a training website (for students and tutors) and a public website based on the corresponding XPAGES contribution in WebJaxe. The two websites can be created independantly.
If a website already exists, its folder will be renamed with the "old" suffix. It should be later removed by hand on the server.
As a reminder, the following differences exist between the websites :
- The public website does not display answers for evaluation exercises. As opposed to the student website and the tutor website, no dynamic tool is available (forum, chat, search engine).
- The student website contains the forms in the evaluation exercises to let students send their replies with the reply editor. Some other tools are available, but links should be made to them from the home page (search engine, forum, chat, replies to exercises, link to the latest visited page).
- The tutor website displays the answers for the evaluation exercises. As with the student website, some tools are available but links to them should be added on the home page (search engine, forum, chat, student readings, replies to exercises).
A problem for the link to the tools is that by default the same home page is generated for the students and the tutors. In practice, home pages are often created by hand and the index.html files are replaced by hand after the website generations.
Maintenance
Maintenance
Removing the old records for exercises, readings and connections, example with the date "2008-08":
do SQL queries directly on the database (currently there is no web interface to do that) :
delete e.* from exercices e where e.date < '2008-08'
delete l.* from lectures l,connections c where c.debut < '2008-08' and l.numconnection=c.numero
delete c.* from connections c where c.debut < '2008-08'
E-learning platform
Site registration
One the contents have been created with WebJaxe and the website generated with PAELLOS administration interface, the website can be used.
Student and tutor registration on the training website
Registration is done on the page/SITENAME/Inscription for the students, /SITENAME/Inscription?fonction=tuteur for the tutors. If there are several trainings, it is possible to specify the training by adding the addresses /SITENAME/Inscription?formation=TRAININGNAME and /SITENAME/Inscription?formation=TRAININGNAME&fonction=tuteur
Readings
Each time a student passes by a site page, the information is recorded on the server. This makes it easy later for tutors to follow their sudents, although the only reliable way remains the exercises.
Tutors can obtain a list of their student readings by identifying at the page /SITENAME/Lectures .
List of exercises replies
Students can look again at the replies they sent for the exercises, from the page /SITENAME/Exercices. The list gives for each exercise a number, the title, the path and the date. The reply can be read by clicking on the title, and the exercise page can be read by clicking on the path. The number is used to order replies when several replies are sent for the same exercise.
At the same address, tutors can access all their student replies. They select a student in the list of associated students to get the list of the student replies. The administrator and the supertutor can see all the students. On an exercise reply page, a tutor can send a reply with the correction. As the students, tutors can use the reply editor to write a reply.
Tutors can just sent their corrections by email if they wish, but for each new student reply for a given exercise, the associated tutor can also see the corresponding page and reply with the platform.
Other features
The training website generation includes an indexation of the contents, which is then used for efficient searches on the website. The indexation is based on the XML files to optimize the indexation, which provides better results than if the indexation was done on the HTML files (for instance, the navigation menu on the left is not taken into account in the indexation).
Searching the website is done with the page : /SITENAME/Recherche
It is possible to change a password from the page /SITENAME/site/changementmdp
Students can directly go to the latest page they visited with the following link : /SITENAME/site/derniere-page
Logout : /SITENAME/site/logout
Using the editor to reply to exercises
The reply editor
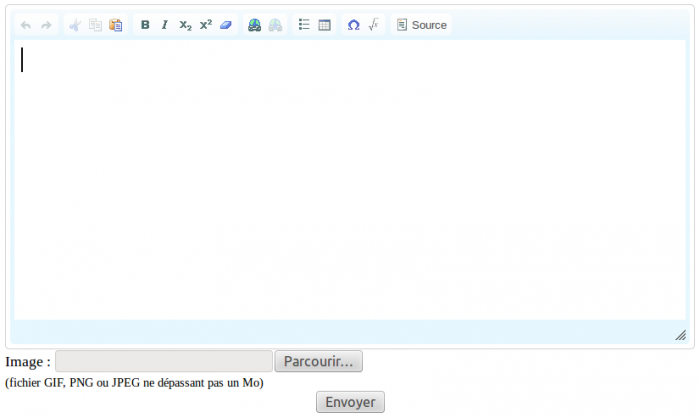
Screenshot of the reply editor
The exercise in the web page
On the training website, an evaluation exercise appears with :
- a text area for the reply
- the button to launch the calculator on the top right
- a "Choose the file" button, to select an image to attach to the reply
- a "Send" button to send the reply
Using the editor buttons is not necessary (it is possible to use simple text with an attached image), but it makes writing complex equations easier. These buttons require Javascript to be activated.
Adding a reply in the editor
To write a clear reply, it is preferable to separate it into questions. This is for instance possible with line breaks and numbers 1) 2) 3) for the reply to each question in the exercise.
Editing
The different editor buttons correspond to the following features (keyboard shortcuts use the ctrl or the cmd key depending on the operating system):
- Cancel (ctrl-Z)
- Redo (ctrl-Y)
- Cut. Javascript operations on the clipboard can be forbidden by the web browser. In this case one can simply use the keyboard shortcuts: ctrl-X to cut text.
- Copy (ctrl-C)
- Paste (ctrl-V)
- Bold style (ctrl-B)
- Italic style (ctrl-I)
- Subscript style
- Superscript style
- Remove the styles (in the selection)
- Link (to create or modify a web link on the selected text) (ctrl-L)
- Remove the link (at the cursor position)
- List
- Table
- Symbol. Displays a table of special characters which can be inserted at the cursor position. It is also possible to insert greek letters with an equation, but it is often faster with symbols.
- Equation (ctrl-E).
- Source code. Useful for instance to do a copy-paste from the Jaxe editor. Click on it again to get back to the WYSIWYG view (it will not work if the XML syntax is not correct).
Equations
Most of the editor usefulness lies in its ability to facilitate the insertion of equations, because it is difficult to write and read complex equations with simple text. The equation editor uses a particular syntax, detailed in the next page.
To use the editor, enter the text for the equation in the text area at the bottom of the dialog, and click on the "Preview" button to see the equation image appears below. For instance, after entering "x^2", and clicking on "Preview", x2 appears below. To insert the equation in the text, click on the "Ok" button. To edit an existing equation, just double-click on it.
The syntax is relatively intuitive, but it is necessary to follow it in order for the equation to be correctly displayed for the tutor. For instance, operators must always be specified (as if the equation was going to be evaluated with values for the variables), so "2*x" must be used instead of "2x".
Spell checker
It is possible to use the web browser spell checker for the web browsers that have one, but it cannot be done with a simple right click because it triggers the editor's contextual menu. The Ctrl key (or cmd on MacOS) has to be used at the same time as a right click to display the browser's contextual menu and use its spell checker.
Jaxe equations syntax
The equation editor
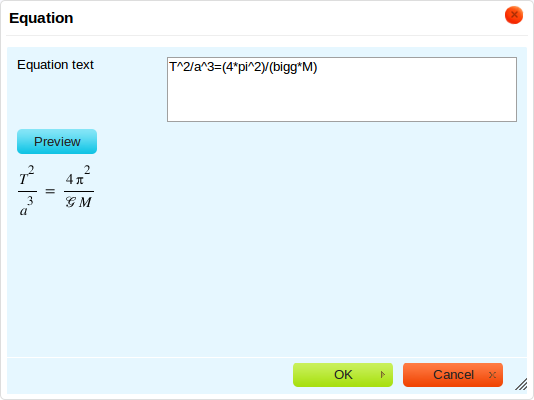
Screenshot of the equation editor
The equation editor works with a text area to enter an equation with a specific syntax, and the image for the equation is displayed below when the "Preview" button is clicked.
Here are some rules to follow in order to make the best use of the editor :
- Do not use spaces (they are ignored in the best case).
- Write the equation as if it would be interpreted mathematically and a numerical result would be calculated. As a consequence, always specify the operators, even when they should not be displayed.
- Use parenthesis to specify the order of the operations if it does not match the mathematical evaluation order.
As opposed to many equation editors, this editor analyses the mathematical meaning of the equation. It then builds the image from there. This makes it possible to get uniform graphical results for all equations. On the other hand, it is not possible to specify display constraints, for instance to obtain a little more space between two characters : the user gives the meaning for the equation, and the editor is in charge of finding the best display for it.
- Addition and subtraction
Operators '+' and '-'.
- Multiplication
Operator '*', displayed only when two numbers are multiplied.
Example : 2*3*sin(1.5*pi) is displayed : 
- Division
Operator '/' (displayed as a fraction) and functions 'slash' and 'fraction'
Example : slash(a;b)/c is displayed : 
- Function
The parameter separator is the semicolon, to distinguish it from the coma, sometimes used in numbers : functionname(arg1;arg2;...)
Example : f(x;y) is displayed : 
- Power
Operator '^'.
Example : x^y is displayed : 
- Subscript
Operator '_'.
Example : x_(ab) is displayed : 
- Subscript superscript
Function 'subsup' with the first term, and the elements to display as subscript and superscript.
Example : subsup(A;1;2) is displayed : 
- Units
Function 'unit', with the unit as the second parameter.
Example : bigg=unit(6.67259*10^(-11);m^3*kg^(-1)*s^(-2)) is displayed : 
Note that units are displayed with a plain font, while a variable like  is displayed with an italic font.
There is also an operator to specify units in a more concise way: #.
Examples: 2#m is displayed :  ; (2/3)#(m*s^(-1)) is displayed :
  (note that parenthesis are required in this formula)
- Square root
Function 'sqrt'.
Example : sqrt(x/2) is displayed : 
- Root
Function 'root' with the degree of the root as the second parameter.
Example : root(x;3) is displayed : 
- Absolute values
Function 'abs'.
Example : abs(x^3) is displayed : 
- Power of e
Function 'exp'.
Example : exp(x^2) is displayed : 
- Integral
Function 'int', with 4 parameters: the function to integrate, the integration variable, and the minimum and maximum bounds.
Example : int(f(x);x;0;infty) is displayed : 
- Sum and product
Functions 'sum' and 'prod', with 3 parameters: the function to sum up, and the minimum and maximum bounds.
Example : sum(ln(k)/k;k=1;10) is displayed : 
- Matrix
Function 'matrix', with the lines as parameter as a function 'line'.
Example : matrix(line(1;2;3);line(4;5;6)) is displayed : 
- Greek letters
Variables with the letter name, with an uppercase to the first character of the name to get an uppercase Greek letter.
Example : alpha*Delta*thetasym*upsih*piv is displayed : 
- Special characters
Variable with the name of the special character.
sun|star|earth|planck|infin|angstrom|ell|hat|bar|asterisk|bigg|...
Example : M_sun/M_earth=3.329*10^5 is displayed : 
- Special operators
Special code with no space.
!=|~=|<=|>=|<<|>>|->|forall|exists|part|nabla|prop|cross|plusminus|cap|cup
Example : forall a exists b<<c~=d>=e!=f is displayed : 
- Accents
Function 'accent' with the letter and the accent to add above.
Example : accent(AB;->)+accent(ABC;hat)+accent(x;bar) is displayed : 
- Time derivatives
Function 'timed' with the variable and the number of dots to display above.
Example : timed(theta;2) is displayed : 
- Vectors
Function 'vector' with the name of the vector.
Example : vector(u_theta) is displayed : 
- Scalar product
Function 'scalarp' with the two vectors as parameters.
Example : scalarp(vector(AB);vector(CD)) is displayed : 
- Norm
Function 'norm' with the vector as a parameter.
Example : norm(vector(AB)) is displayed : 
- Functions with no parenthesis
Some functions are displayed without parenthesis when they have a single parameter with a variable.
Example : sin(a)*sin(b) is displayed : 
- Equation system
Function 'system', with the lines as parameters.
Example : system(x+y=2;x-2*y=3) is displayed : 
- Factorials
Function 'fact'.
Example : fact(x) is displayed : 
- Mean
Function 'mean'.
Example : mean(M_B) is displayed : 